Introduction to Starbucks Cake Pops
When we think of cake pops, we might envision those delightful little spheres of cake balanced on a stick, covered in colorful chocolate or candy coating. But have you ever wondered about the history behind these sweet treats? The origin of cake pops can be traced back to the early 2000s, crafted by Bakerella, a popular cake designer and author. Her creative vision turned leftover cake into delightful confections, sparking a craze that soon reached cafes and pastry shops worldwide. It wasn’t long before Starbucks Cake Pops captured hearts with their unique flavors and eye-catching designs, blending the experience of a coffee break with a sugary pick-me-up.
So, what makes Starbucks Cake Pops so incredibly popular? It’s a mix of the adorable presentation, irresistible flavors, and sheer convenience. Each cake pop is a small, portable dessert that’s easily enjoyed on the go—perfect for busy professionals rushing through their day. According to a report from the National Confectioners Association, approximately 70% of millennials prefer indulging in smaller, snack-sized options over traditional desserts, making cake pops a brilliant answer to satisfying that sweet tooth without guilt.
Additionally, Starbucks offers a range of flavors, from the classic Chocolate Cake Pop to seasonal delights that make every visit feel special. Their visually appealing design and playful presentation not only make them a favorite among customers but also a perfect companion for your afternoon coffee or tea.
Moreover, the social media presence surrounding these tasty treats has created a buzz that continues to spark interest. So whether you’re popping into your local café to grab a quick treat or considering making your own version at home, Starbucks Cake Pops are beloved not just for their taste but also for the happiness they evoke.
Curious about how to recreate these beauties? Stay tuned for the full recipe to bring these café-worthy delights into your own kitchen!
Ingredients for Starbucks Cake Pops
If you’ve ever found joy in the delightful Starbucks Cake Pops, you’ll love making them at home! The beauty of these treats lies not only in their taste but also in the simplicity of the ingredients. Here’s what you’ll need to whip up your very own batch:
Essential Ingredients
- Cake Mix: Choose your favorite flavor, whether it’s chocolate, vanilla, or red velvet. This is the foundation of your cake pops.
- Eggs: Typically, 3 eggs are needed, depending on your cake mix instructions. They help bind everything together beautifully.
- Oil: Vegetable or canola oil works best for moisture. You’ll want about 1/3 cup.
- Frosting: A 1/2 cup of store-bought or homemade frosting in a complementary flavor can make all the difference.
- Candy Melts: These come in various colors and flavors. You’ll need enough to coat your pops completely—about 2 cups should suffice.
- Lollipop Sticks: Essential for crafting the perfect pop! You can usually find these at craft or baking stores.
These ingredients are all you need to start your cake pop journey! For a deeper dive on baking techniques, check out this comprehensive guide on cake baking. Enjoy creating these sweet bites of happiness!
Step-by-Step Preparation of Starbucks Cake Pops
Making Starbucks Cake Pops at home is a fun and rewarding experience that allows you to replicate the delightful sweet treats you enjoy at your favorite coffee shop. Whether you’re prepping for a get-together or just satisfying your sweet tooth, follow these steps to create delicious cake pops that will impress everyone. Let’s get started!
Gather Your Ingredients
Before diving into the preparation, you’ll want to have everything on hand:
- 1 box of cake mix (your favorite flavor)
- 3 eggs
- 1/2 cup of vegetable oil
- 1 cup of water
- 1 cup of frosting (store-bought or homemade)
- Candy melting wafers (chocolate or colors of your choice)
- Cake pop sticks
- Sprinkles or other toppings (optional)
Prepare the Cake Mix
Start by preheating your oven according to the instructions on your cake mix box. In a large mixing bowl, combine the cake mix with the eggs, vegetable oil, and water. Beat the mixture until it is smooth and lump-free. Pour the batter into a greased baking pan and bake for the recommended time. Once out of the oven, let the cake cool completely.
Crumble and Mix with Frosting
Once your cake is cool, it’s time to crumble it. Using your hands, break the cake into small pieces. This step is crucial as the finer the crumbs, the better your Starbucks Cake Pops will hold their shape. Next, add about one cup of frosting to the crumbs. Mix thoroughly until the cake and frosting are well combined and form a dough-like consistency. Remember, you can always adjust the frosting to get the right texture – too much will make it overly sweet.
Forming the Cake Balls
With your mixture ready, take small portions and roll them into balls about the size of a golf ball. This should yield 20 to 30 cake balls depending on how large you make them. The key here is to ensure they are solid enough to stay together, so squeeze firmly, but don’t overdo it! Once you’ve formed all the balls, place them on a baking sheet lined with parchment paper.
Insert Cake Pop Sticks
Now, it’s time to transform these cake balls into Starbucks Cake Pops. Take your cake pop sticks and dip the ends into melted candy melts (we’ll cover this in a moment). This helps to secure the stick into the cake ball. Insert the stick into each cake ball, about halfway through, and place the pops back on the parchment-lined sheet. Chill them in the fridge for about 15 minutes to firm up.
Melt the Candy Wafers
While your cake pops are chilling, melt the candy wafers according to the package instructions. You can do this in a microwave-safe bowl in 30-second intervals, stirring in between. If you’re feeling adventurous, try using different colors or flavors for a twist!
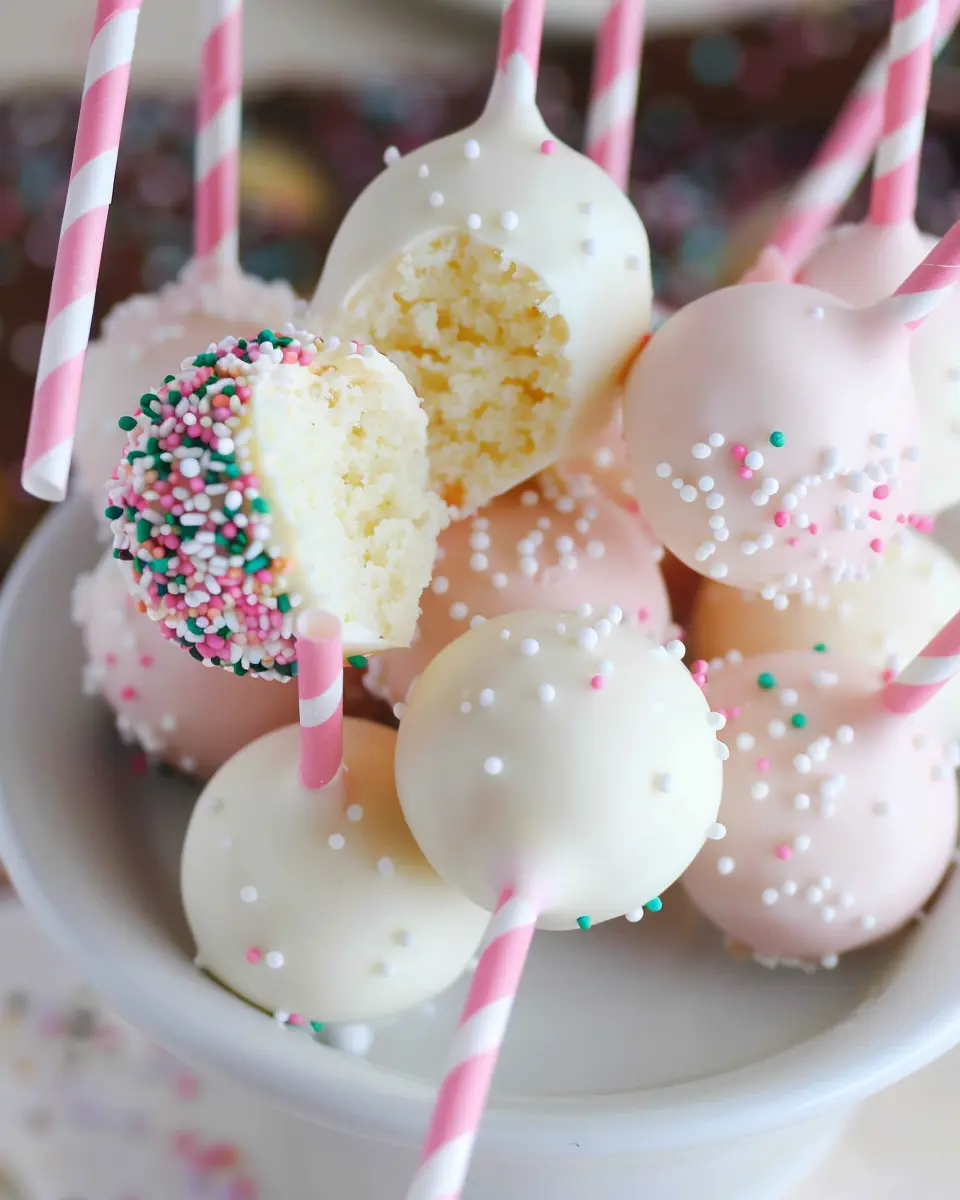
Coat the Cake Pops
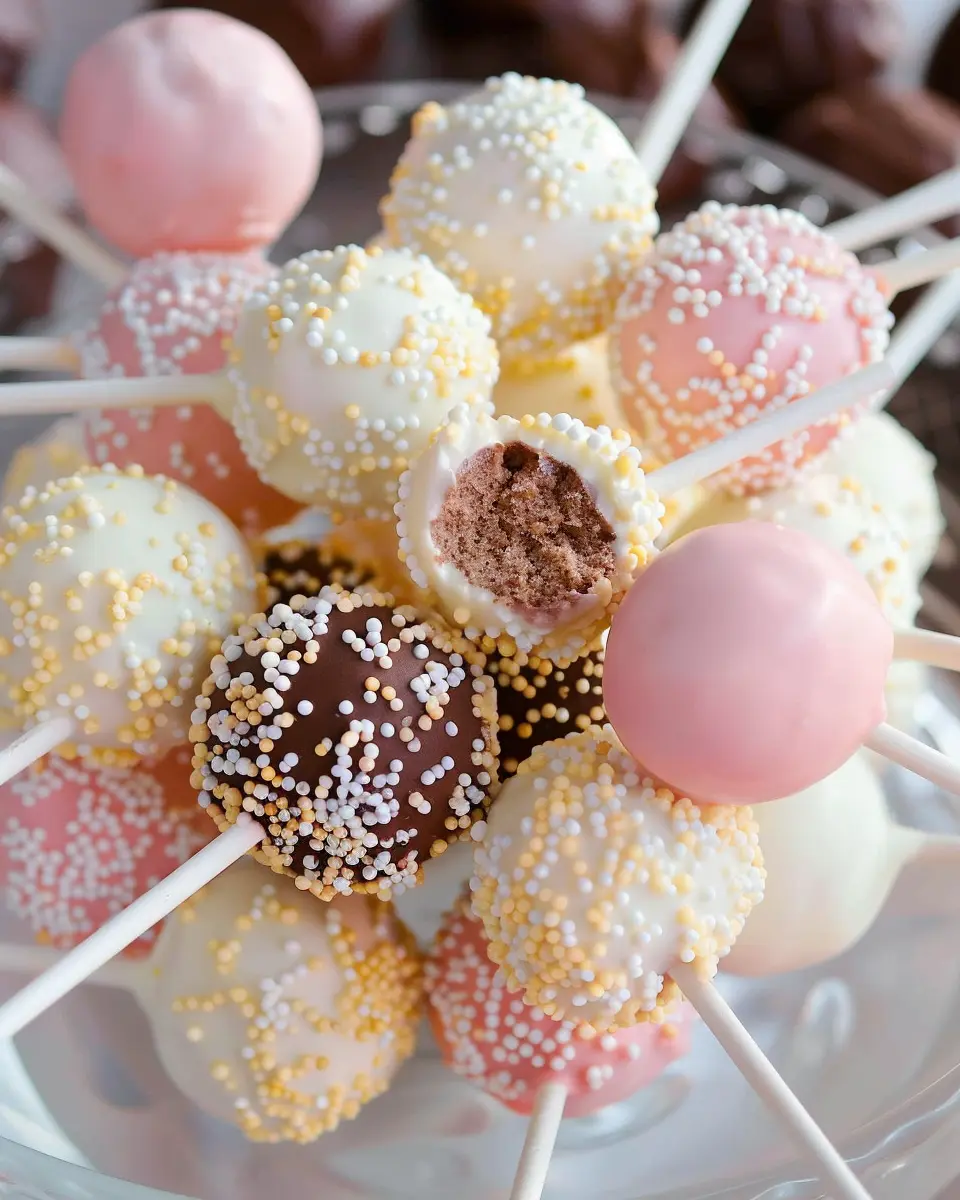
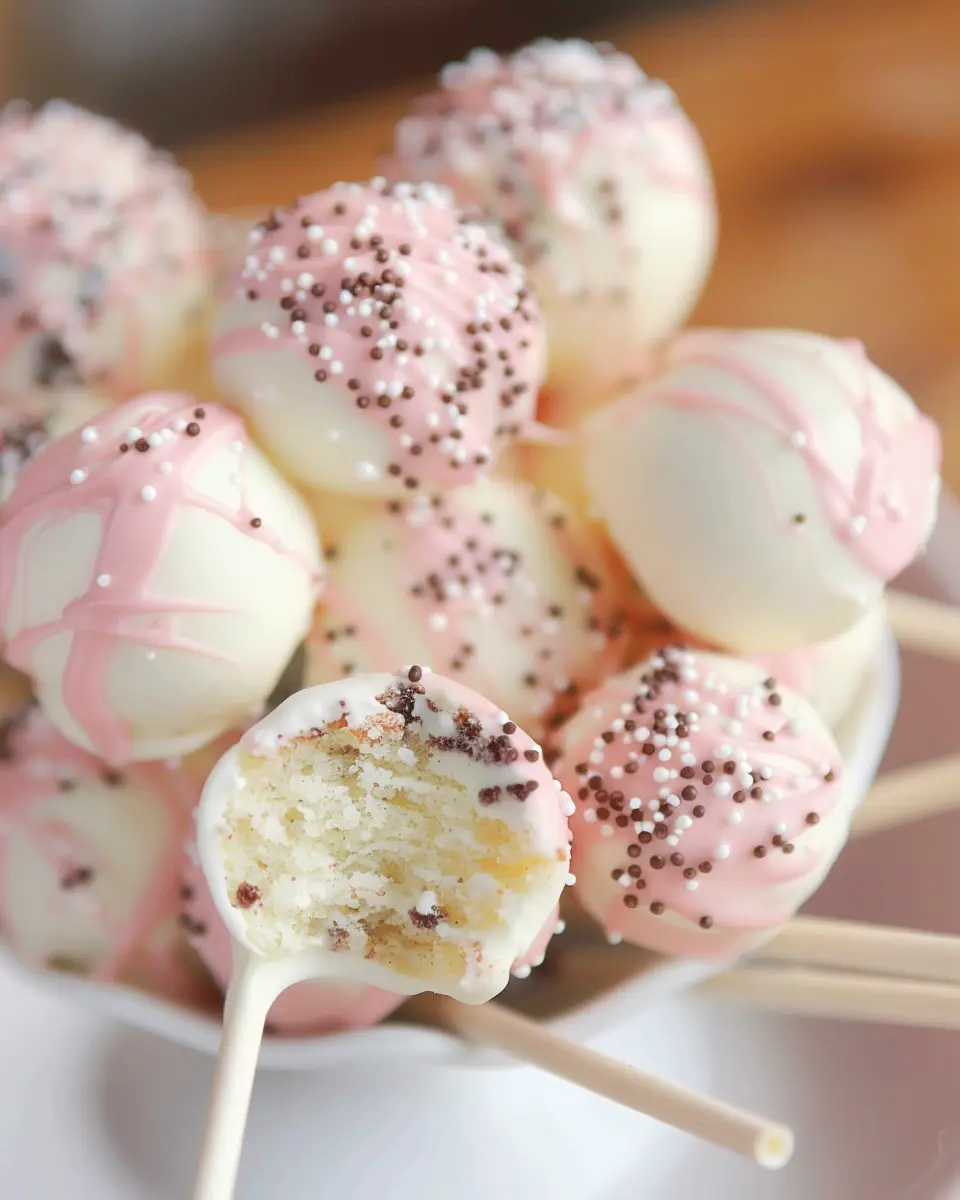
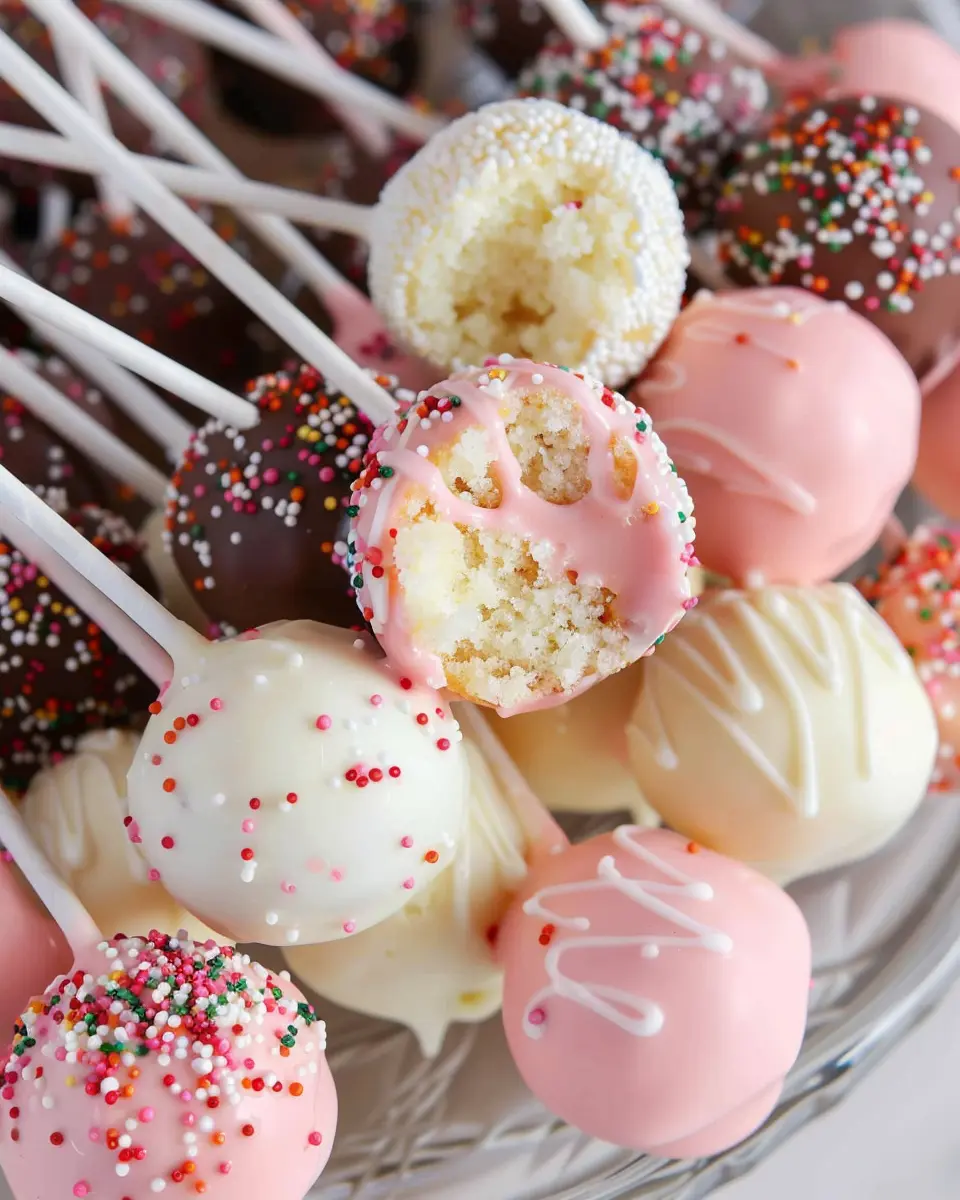
Once your candy melts are smooth and melted, carefully dip each cake ball into the chocolate. Make sure it’s fully coated, and gently tap the stick against the side of the bowl to shake off any excess. If you like, add sprinkles or toppings while the coating is still sticky for extra decoration.
Chill and Enjoy!
Finally, place the coated Starbucks Cake Pops upright in a foam block or a special cake pop stand. Let them chill in the refrigerator for about 30 minutes until the coating hardens. Once set, these delightful treats are ready to serve! They’re perfect for sharing or enjoying on a cozy night in with a good book and a cup of your favorite coffee.
For even more inspiration on baking and dessert ideas, check out resources like The Kitchn and Food Network. Now, you’re all set to enjoy your homemade cake pops that rival the coffee shop’s delights. Happy baking!
Variations on Starbucks Cake Pops
When you’re craving something sweet, Starbucks cake pops are a fantastic indulgence. But why stop at the classic when there are so many fun variations to explore? Let’s dive into a few delightful options that will elevate your cake pop game!
Chocolate-covered Cake Pops
For chocolate lovers, these cake pops are a match made in heaven! Start with your basic cake pop recipe, but opt for a rich chocolate cake mix instead of vanilla. After shaping your cake balls, dip them in melted dark or milk chocolate instead of vanilla coating. To add some flair, top with crushed nuts, sprinkles, or even a drizzle of contrasting colored chocolate. This is a guaranteed hit at any gathering—after all, who can resist the allure of chocolate?
Rainbow Cake Pops
Looking to add a splash of color to your dessert table? Rainbow cake pops are a joyous way to entertain your guests and brighten up any occasion. Begin with a white cake mix and separate the batter into several bowls, tinting each with different food coloring. Layer the batters in a cake pan and bake before crumbling into cake pop mixture. After dipping them in white chocolate, finish with a sprinkle of edible glitter. It’s not just a cake pop; it’s a celebration on a stick!
Seasonal Cake Pops
Get festive with seasonal cake pops! Whether it’s pumpkin spice for fall or peppermint for winter, using seasonal flavors can create a thematic treat. For Halloween, mold pops into ghost shapes, while for Valentine’s Day, opt for heart motifs and pink icing. You can find ideas and inspiration at sites like Food Network or All Recipes to keep your cake pop game fresh year-round.
These variations not only impress but also allow you to express your creativity in the kitchen. So grab your ingredients and start experimenting—you never know what delicious surprises await!
Cooking Tips and Notes for Starbucks Cake Pops
Ensure Proper Chilling Time
To achieve the perfect texture for your Starbucks Cake Pops, ensuring proper chilling time is crucial. Once you’ve mixed your cake and frosting, roll them into balls and place them on a baking sheet lined with parchment paper. Chill them in the refrigerator for at least an hour. This step helps the cake pops firm up, making it easier to dip them into the melted coating later. If you can, leave them in the fridge for a couple of hours — it’s worth the wait!
Tips for Melting Wafers
Melting chocolate or candy melts is an art in itself! Start by chopping the wafers into smaller pieces to ensure even melting. Use a microwave-safe bowl and heat the wafers in 30-second intervals, stirring in between. This method prevents scorching, helping you achieve that silky smooth texture essential for coating your Starbucks Cake Pops. For a twist, consider adding a teaspoon of coconut oil to the melted mixture to achieve a nice glossy finish.
For more comprehensive melting tips, consider checking resources like The Spruce Eats. Happy baking!
Serving Suggestions for Starbucks Cake Pops
Perfect pairings for coffee
When you think about enjoying your Starbucks Cake Pops, consider how they can elevate your coffee experience. These delightful treats pair beautifully with a variety of beverages. Here are some recommendations to try:
- Classic Espresso: The rich, bold flavors of espresso balance the sweetness of the cake pops.
- Vanilla Latte: The creamy texture and vanilla notes complement the cake’s flavors, creating a dessert that’s both comforting and indulgent.
- Chai Tea: With its warm spices, chai provides an interesting contrast to the sweetness of the cake pop, perfect for those who appreciate a little kick.
For more coffee pairing ideas, check out The Spruce Eats for an in-depth guide on beverage pairings.
Creative presentation ideas
Don’t just store your Starbucks Cake Pops in a box! Elevate their appeal with some creative presentation techniques:
- Decorative Sticks: Wrap the sticks in colorful washi tape to match any occasion.
- Cake Pop Stand: Invest in or make a cake pop stand to display them at parties, making them the centerpiece of your dessert table.
- Clear Favor Bags: Place individual cake pops in clear bags tied with ribbon for a charming takeaway treat at gatherings.
Your guests will love how visually appealing and delicious these pops are. With these serving suggestions, your Starbucks Cake Pops will surely be the highlight of any coffee break!
Time Breakdown for Starbucks Cake Pops
When diving into the delightful world of Starbucks Cake Pops, understanding your time commitment can make the process smoother and more enjoyable. Here’s a quick breakdown to help you manage your baking schedule perfectly!
Preparation Time
The preparation for your Starbucks Cake Pops generally takes about 30 minutes. This includes gathering all your ingredients, mixing the cake, and shaping it into those adorable bite-sized pops. Pro tip: have everything ready so you can breeze through this step!
Chilling Time
After you’ve shaped your cake pops, they need to chill for about 1 hour. This step is crucial—you want them firm enough to be dipped smoothly in coating without falling apart.
Total Time
In total, you’re looking at around 1 hour and 30 minutes from start to finish. With this simple breakdown, you can easily fit these delicious treats into your schedule. So why not grab the ingredients from your local grocery store and get started? By the way, if you want to explore more cake pop variations, check out some expert tips over at The Spruce Eats and get inspired!
Nutritional Facts for Starbucks Cake Pops
When indulging in Starbucks Cake Pops, knowing the nutritional facts can help you make informed choices. Here’s a quick rundown:
Calories
Each cake pop typically contains around 150 calories. That’s not too shabby for a sweet treat, especially when you’re craving a little something on the go.
Sugar Content
These delightful bites can pack a punch when it comes to sweetness, with approximately 14 grams of sugar per pop. This means they’re perfect for satisfying that sweet tooth, but they might not be the best choice if you’re watching your sugar intake.
Fat
In terms of fat, Starbucks Cake Pops usually have around 7 grams. While some of this fat is from the delicious chocolate coating, it’s always wise to enjoy these treats in moderation.
For further details about nutritional guidelines, you can check out resources like the FDA’s Nutrition Facts page. Have any favorite ways to enjoy these cake pops? Share them in the comments!
FAQs about Starbucks Cake Pops
Can I use a different cake flavor?
Absolutely! While the classic Starbucks cake pops often feature flavors like vanilla or chocolate, feel free to experiment. Maybe a red velvet or lemon cake suits your palate better? Using different cake flavors can add a personal touch, enhancing the treat’s uniqueness and making it even more delightful for those who indulge in your creations. Don’t hesitate to mix and match with your favorite icing flavors too!
How should I store cake pops?
To keep your beautiful Starbucks cake pops fresh and delicious, store them in an airtight container at room temperature if you plan to eat them within a couple of days. For longer storage, you can refrigerate them for up to a week. Just remember to let them come to room temperature before enjoying for the best flavor experience. If you’ve made a large batch, consider freezing them. When done correctly, frozen cake pops can last for a few months—just thaw them in the fridge overnight before indulging.
Can I decorate cake pops differently?
Absolutely! Decorating your Starbucks cake pops is where the fun truly begins. You can dip them in colored chocolate melts, sprinkle them with coconut flakes, or even drizzle them with contrasting colors for an artistic flair. Plus, there are countless ideas online, like using edible glitter or themed decorations for special occasions. Why not make them festive for holidays or birthdays? The possibilities are endless, and the extra touch can make your cake pops even more memorable!
For creative inspiration, check out resources like Wilton for decorating ideas. Enjoy experimenting!
Conclusion on Starbucks Cake Pops
Making Starbucks Cake Pops at home is an enjoyable and rewarding experience. Not only do you have full control over the ingredients, which means you can customize the flavors and decorations, but it’s also a fun activity to share with friends or family. Plus, who can resist the satisfaction of creating these adorable treats from scratch?
Imagine surprising a loved one with a batch of homemade cake pops, or saving money by crafting your favorite coffee shop indulgence right in your kitchen. For more information on getting started, check out this helpful guide on cake pop techniques or explore unique flavor ideas on this baking blog. It’s time to get baking and enjoy the delightful world of cake pops!
PrintStarbucks Cake Pops: Easy Indulgence for Home Bakers

Learn how to make delicious Starbucks-style cake pops at home with this easy recipe.
- Prep Time: 20 minutes
- Cook Time: 30 minutes
- Total Time: 1 hour
- Yield: 12 cake pops 1x
- Category: Dessert
- Method: Baking
- Cuisine: American
- Diet: None
Ingredients
- 1 box chocolate cake mix
- 1 cup frosting
- 2 cups chocolate chips
- 1 tablespoon coconut oil
- 10–12 lollipop sticks
Instructions
- Prepare the chocolate cake mix according to package instructions.
- Once baked, crumble the cake in a large bowl and mix in the frosting until well combined.
- Form small balls from the mixture and place them on a lined baking sheet.
- Freeze the cake balls for about 30 minutes.
- Meanwhile, melt the chocolate chips with coconut oil in a microwave-safe bowl.
- Dip the lollipop sticks into the melted chocolate, then insert them into the center of each cake ball.
- Coat each cake pop in the chocolate mixture and let them set on a stand or in a block of foam.
Notes
- Experiment with different cake flavors for variety.
- For a festive touch, add sprinkles to the chocolate coating.
Nutrition
- Serving Size: 1 cake pop
- Calories: 150
- Sugar: 10g
- Sodium: 50mg
- Fat: 8g
- Saturated Fat: 4g
- Unsaturated Fat: 3g
- Trans Fat: 0g
- Carbohydrates: 20g
- Fiber: 1g
- Protein: 2g
- Cholesterol: 10mg
Keywords: Starbucks Cake Pops