Introduction to Dutch Oven No Knead Bread
Why You Should Make Your Own Bread at Home
Have you ever taken a whiff of freshly baked bread and felt a wave of warmth and nostalgia wash over you? That feeling is something you can create right in your own kitchen. Making bread at home is not only a delightful experience, but it also gives you more control over the ingredients, which can lead to healthier choices. While store-bought bread is convenient, it often contains preservatives and added sugars that can be avoided when you bake your own. Plus, nothing beats the satisfaction of pulling a golden, crusty loaf of Dutch Oven No Knead Bread from your oven.
Think about it: What if you could impress your friends with the irresistible aroma of homemade bread? Even if you’re a cooking novice, this simple recipe requires minimal effort, making it perfect for busy young professionals. According to a recent survey, 67% of people who bake at home report feeling more relaxed and accomplished. So, why not give it a shot?
The Magic of the Dutch Oven
Now, let’s talk about the star of the show: the Dutch oven. This versatile kitchen tool is a game-changer for bread enthusiasts. Its heavy lid and thick walls create the ideal environment for baking bread, mimicking the steam and heat of a professional bread oven. As the bread bakes, the steam trapped inside helps to form a perfectly crispy crust while keeping the inside soft and airy.
But don’t just take my word for it—many professional bakers swear by the magic of the Dutch oven when it comes to artisan bread. The result? A loaf that looks and tastes like it came from a fancy bakery without requiring hours of kneading and fussing.
If you're curious about the science behind this, check out this informative article from King Arthur Baking that dives deeper into why Dutch ovens are such a stellar choice for bread baking.
So, are you ready to embark on your bread-baking journey? Let’s gather our ingredients and dive into the wonderful world of Dutch Oven No Knead Bread! You'll find it's a rewarding pursuit that can elevate your culinary skills and satisfy your cravings all at once.
Ingredients for Dutch Oven No Knead Bread
When it comes to making delicious Dutch Oven No Knead Bread, simplicity is key. This recipe requires just a handful of ingredients that you likely already have in your pantry. Before you dive in, let’s gather everything you need:
- All-purpose flour: 3 cups, providing structure and chewiness. Whole wheat flour is a great alternative for added nutrition!
- Water: 1½ cups, warm but not hot, creates the ideal environment for yeast to act.
- Active dry yeast: ¼ teaspoon, this little powerhouse is what makes your bread rise.
- Salt: 1 teaspoon, a crucial seasoning that enhances flavor. Consider using sea salt for added texture and taste.
- Optional add-ins: Feel free to get creative! Mix in chopped herbs, garlic, or even a sprinkle of cheese for extra flavor.
With these basic ingredients in hand, you’re on your way to baking an irresistible loaf that pairs perfectly with soups, salads, or even as a standalone snack! For more tips on ingredient quality, check out this article on baking staples. Happy baking!
Step-by-Step Preparation of Dutch Oven No Knead Bread
There’s something absolutely magical about fresh bread pulling from the oven. If you’ve ever dreamt of that crusty, golden loaf without having to master the fine art of kneading, you’re in for a treat with this Dutch Oven No Knead Bread recipe. It’s almost foolproof, and you’ll find that it requires minimal effort but delivers impeccable results. Let’s dive into the steps, shall we?
Combine warm water, yeast, and salt
Start by gathering your ingredients, which includes:
- 3 cups of all-purpose flour
- 1 ½ teaspoons of salt
- ½ teaspoon of active dry yeast
- 1 ½ cups of warm water (not hot, around 110°F)
In a large mixing bowl, combine the warm water, yeast, and salt. Let these ingredients mingle for about 5 minutes. You should see some bubbles forming, which means the yeast is coming to life. Using warm water activates the yeast, helping it work its magic. If you need tips on specific types of yeast, check out reliable resources like the King Arthur Baking Company.
Add flour and form the dough
Once your yeast mixture is bubbly, it’s time to add the flour. Gradually sprinkle in the flour and mix it with a wooden spoon or spatula until a shaggy, sticky dough forms. Make sure all the flour is incorporated; no dry bits should remain. The dough may look quite wet and that’s perfectly fine – it’s what gives you that lovely texture!
Let the dough rise
Now comes the waiting game, which is arguably the hardest part! Cover the bowl with a clean kitchen towel or plastic wrap and let it rise in a warm, draft-free spot for at least 12 to 18 hours. Yes, you read that right—no need for constant attention! This long rise allows the flavors to develop deep and complex profiles, leading to that artisanal taste we all crave.
Preheat the Dutch oven
About 30 minutes before you're ready to bake, preheat your oven to 450°F. At the same time, place your Dutch oven (with its lid) in the oven to preheat as well. This step is crucial, as preheating not only helps in creating an amazing crust but also assists in attaining a nice oven spring, which gives your loaf its height.
Shape the dough and prepare for baking
After your dough has risen beautifully, you’ll want to gently turn it out onto a floured surface. Don't worry if it’s a little sticky; just flour your hands lightly to handle it. With floured hands, fold the dough inwards a couple of times to shape it into a ball. Then, let it rest for about 15 minutes while your Dutch oven continues to heat up.
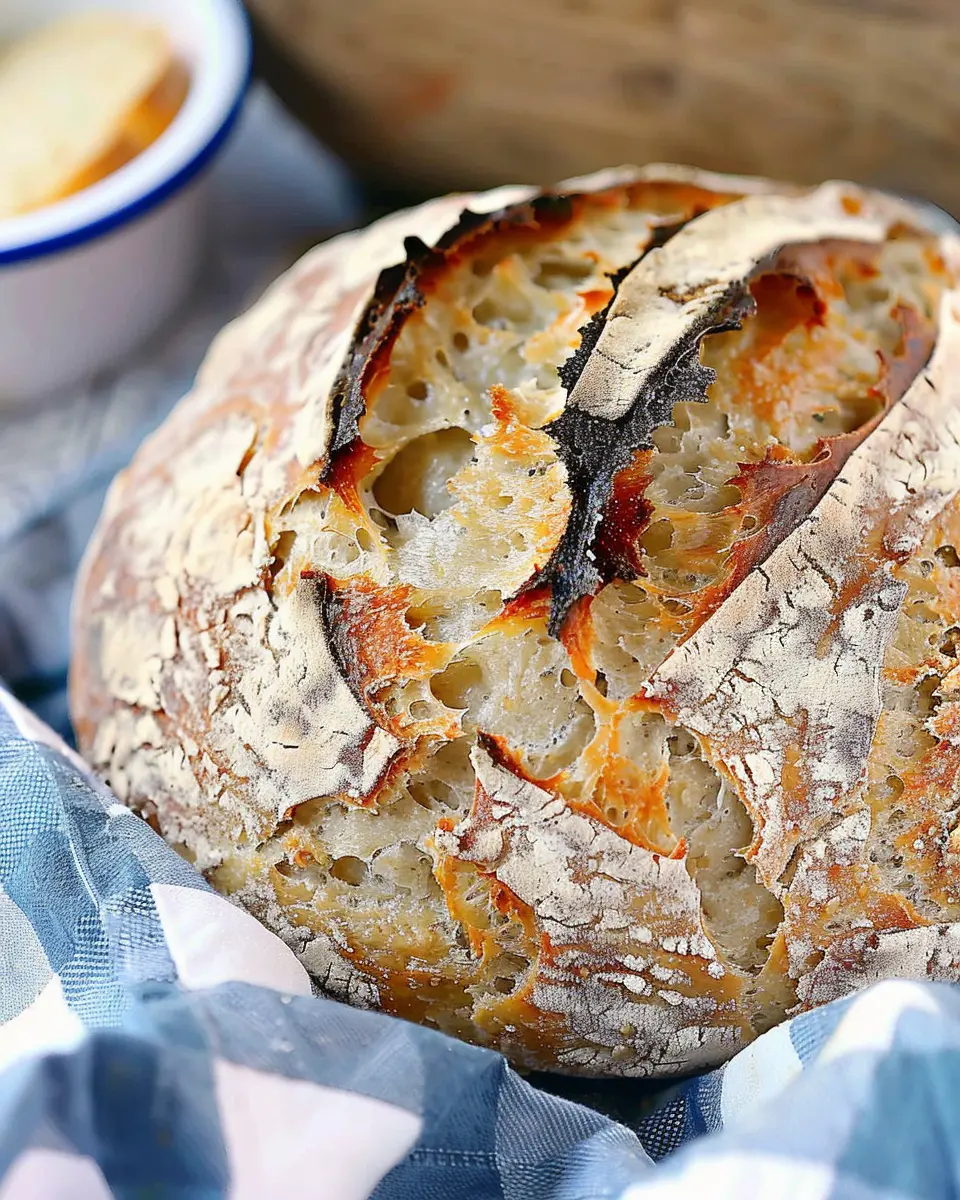
Before you bake, you can slash the top of your loaf with a sharp knife to help it expand while baking. This step is optional but adds a lovely artisan touch.
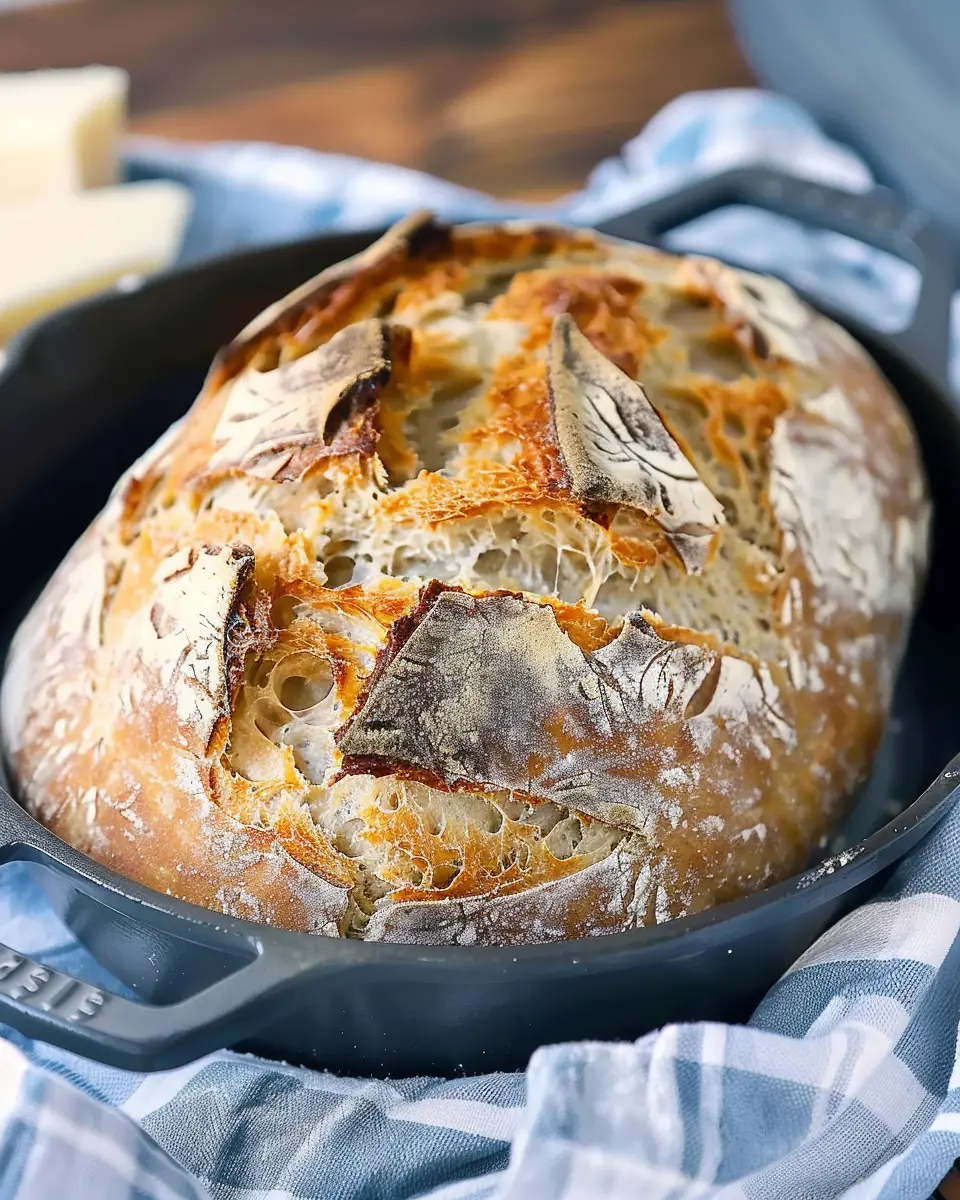
Bake and enjoy the aroma
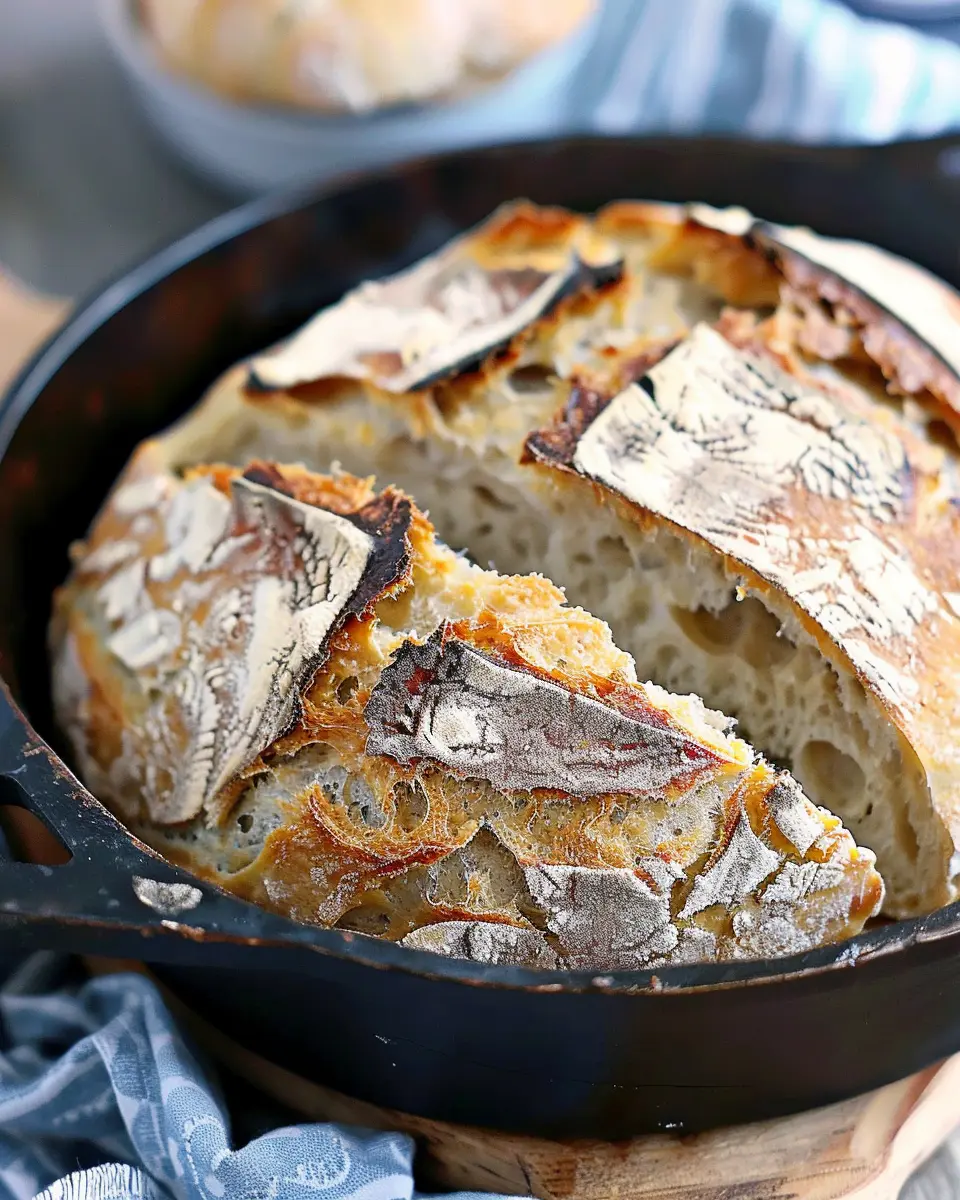
Carefully remove the preheated Dutch oven from the oven using oven mitts—this is where your bread will bake to perfection. Gently place your shaped dough inside (you can opt to use parchment paper for easy removal) and cover it with the lid. Bake for 30 minutes with the lid on, then remove it to bake for an additional 15-20 minutes until the top is a glorious golden brown.
As the aroma fills your kitchen, be prepared for the compliments to come flying in. Your Dutch Oven No Knead Bread is ready to be sliced, slathered in butter, or paired with any of your favorite toppings—perhaps some Turkey Bacon or Chicken Ham. Enjoy the fruits of your labor; you’ve earned it!
With just a few simple steps, you’ve created something extraordinary. The beauty of this method is that even a novice baker can achieve bread that rivals what you’d find at a bakery. For more bread-making tips, consider visiting the Bread Bakers Guild of America. Enjoy!
Variations on Dutch Oven No Knead Bread
If you think the Dutch Oven No Knead Bread is perfect just as it is, think again! With a few tweaks, you can create a delightful range of flavors that will suit any palate. Let’s dive into some delicious variations that are sure to impress your dinner guests or elevate your morning toast.
Herb and Garlic Flavor Twists
Elevate your no knead bread by incorporating fresh herbs and garlic. Simply mix in chopped rosemary, thyme, or basil into your dough for a fragrant twist. You can even sauté minced garlic in a bit of olive oil and blend it into the mix. The result? A savory aroma that fills the kitchen and a loaf that truly sings with flavor. For detailed herb pairing, check out this guide on flavor combinations.
Whole Wheat or Rye Options
For a heartier loaf, consider using whole wheat or rye flour. These options add a nutty flavor and increase the nutritional profile of your bread. When substituting, you can use half whole wheat flour and half all-purpose flour to retain that chewy texture while also getting the benefits of whole grains. Just remember to adjust your water slightly, as different flours absorb moisture differently!
Cheese-Studded Bread for a Savory Treat
If you’re a cheese lover, why not incorporate your favorite cheese into the Dutch Oven No Knead Bread? Cheddar, gouda, or even a little feta can add a savory kick that’s irresistible. Fold in cubes or grated cheese before the first rise, and you’ll have a beautiful gooey surprise with every slice.
With these variations, your no knead bread can adapt to suit any occasion, proving that baking can be a fun and creative endeavor!
Cooking Tips and Notes for Dutch Oven No Knead Bread
Common mistakes to avoid
Making Dutch Oven No Knead Bread can be a fantastic experience, but a few common pitfalls can turn it into a frustrating endeavor:
- Over-kneading: Fortunately, this recipe is designed to be no-knead! Just mix your ingredients and let time work its magic.
- Incorrect water temperature: Using water that's too hot can kill the yeast. Aim for lukewarm—about 100°F (37°C) is ideal.
- Not enough rise time: Patience is key. Let the dough rise until it’s doubled in size for the best flavor and texture.
How to adjust for altitude or humidity
Cooking at high altitude or in humid conditions can affect your bread-making process, but don’t worry!
- For altitude: You might need to increase the flour by a couple of tablespoons. Also, consider shortening the rise time since dough often rises faster.
- For humidity: More moisture in the air can lead to sticky dough. Try adding a bit more flour until you achieve a manageable consistency.
For more insights on baking at different altitudes, check out resources from the King Arthur Baking Company. Happy baking!
Serving Suggestions for Dutch Oven No Knead Bread
Spreads and toppings
One of the best parts about making Dutch Oven No Knead Bread is the sheer variety of spreads and toppings you can choose from. Want a classic combination? Slather on some creamy butter or a rich olive oil dip for that perfect bite. For a flavor twist, try goat cheese with a drizzle of honey, or even a generous spread of fig jam.
Consider layering your bread with high-protein options like turkey bacon or chicken ham for a satisfying sandwich. Avocados mashed with a sprinkle of lime juice also work wonders, turning your bread into a delightful brunch dish.
Perfect pairings for your homemade bread
Pairing Dutch Oven No Knead Bread with complementary dishes takes your meal to the next level.
- Soup: A hearty minestrone or creamy tomato soup creates a warm, comforting combo.
- Salad: Pair with a fresh spinach salad topped with nuts and a vinaigrette for a light lunch.
- Cheese: A charcuterie board with various cheeses, perhaps some aged cheddar or creamy brie, elevates your experience.
Make sure to check out some creative cheese pairings or even explore local farmer’s markets for the highest quality ingredients to complete your meal.
So, why not whip up this delightful bread and gather your friends around the table? After all, meals are best enjoyed together!
Time Breakdown for Dutch Oven No Knead Bread
When it comes to making delicious Dutch Oven No Knead Bread, understanding the time commitment is crucial. Let’s break down the timing so you can plan your baking adventure effectively!
Preparation Time
Getting started only takes about 10 minutes. Just gather your ingredients, mix them together, and let the dough do its thing.
Rising Time
The true magic happens during the 12–18 hours of rising time. This slow fermentation yields a wonderfully developed flavor and texture. Just cover the dough and let it rest overnight—or longer if you prefer!
Baking Time
When you’re ready to bake, allocate about 45 minutes. Preheat your oven and let the bread bake in the Dutch oven until it's golden brown and crusty.
Total Time
In total, you're looking at around 12–19 hours, mostly hands-off. So while it may seem like a long process, most of it is just waiting for the dough to work its wonders. Your Dutch Oven No Knead Bread will be worth every minute!
For more detailed guidance on the fermentation process, check out this informative piece on bread making techniques. Happy baking!
Nutritional Facts for Dutch Oven No Knead Bread
When considering your culinary delights, it’s always wise to keep an eye on the nutritional facts. Here’s a quick breakdown for our delicious Dutch Oven No Knead Bread recipe.
Calories
A slice of this hearty bread contains approximately 120-150 calories, making it a great addition to your meals without breaking the calorie bank.
Protein
Packed with about 4 grams of protein per slice, this bread not only satisfies your carb cravings but also supports muscle repair and growth.
Sodium
With only around 200 mg of sodium, you can savor this Dutch Oven No Knead Bread without worrying too much about your salt intake.
Carbohydrates
Each slice delivers around 25-30 grams of carbohydrates, providing the energy boost you need for your daily activities.
For more detailed nutritional insights, check out credible sources like the USDA's FoodData Central. Enjoy baking and don’t hesitate to share your journey with friends and family!
FAQs about Dutch Oven No Knead Bread
How long can I store leftover bread?
When it comes to Dutch Oven No Knead Bread, you'll be pleased to know it can stay fresh for quite a while! If you store it in a paper bag at room temperature, it should last for about 3 to 4 days. For longer storage, wrapping it in plastic wrap and placing it in the freezer can keep it good for up to 3 months. Just make sure to slice it before freezing for easy access later on. Thaw it at room temperature and toast for that freshly baked feel!
Can I use other flours for this recipe?
Absolutely! While the classic no-knead bread recipe often uses all-purpose flour, you can explore various options. Whole wheat flour adds a nutty flavor and is high in fiber, while bread flour can enhance the bread's texture thanks to its higher protein content. If you're feeling adventurous, try mixing in some rye or spelt flour! Just remember that altering the flour type might affect the hydration level of your dough, so adjust the water accordingly. Helpful resources like King Arthur Baking offer great insights on substitutions.
What if my dough doesn't rise?
If you find your Dutch Oven No Knead Bread isn’t rising as expected, don’t fret! A few common factors can affect dough rise:
- Old yeast: Check the expiration date of your yeast. If it's expired, it may not activate.
- Temperature: Dough thrives in warmth. A chilly kitchen might hinder the proofing process. Consider placing it in a slightly warm oven or near a heat source.
- Humidity: In dry environments, your dough may need a little more water to achieve the perfect rise.
If you're still having trouble, consider checking out advice from bread-making experts at Breadtopia for additional tips. Remember, baking is all about experimentation, so don't get discouraged!
Conclusion on Dutch Oven No Knead Bread
Baking your own Dutch Oven No Knead Bread can feel like a daunting task, but it’s simpler than you might think! With just a few ingredients and minimal effort, you can transform your kitchen into a bakery with this delicious, crusty bread. This recipe is perfect for those new to baking or anyone looking to impress friends and family with a homemade touch.
Don’t hesitate to get your hands a little messy and experiment with flavors by adding herbs, cheese, or even some dried fruit! The joy of pulling a steaming loaf from the oven is truly rewarding. For more baking tips and inspiration, check out resources like King Arthur Baking and Food52 to elevate your culinary game. Happy baking!
PrintDutch Oven No Knead Bread: Easy, Crusty Perfection at Home
Master the art of baking with this easy Dutch Oven No Knead Bread recipe, perfect for achieving a crusty loaf at home.
- Prep Time: 12-18 hours
- Cook Time: 45 minutes
- Total Time: 12-18 hours 45 minutes
- Yield: 1 loaf 1x
- Category: Bread
- Method: Baking
- Cuisine: American
- Diet: Vegetarian
Ingredients
- 3 cups all-purpose flour
- 1.5 teaspoons salt
- ¼ teaspoon instant yeast
- 1.5 cups water
Instructions
- In a large bowl, mix the flour, salt, and yeast together.
- Add the water and stir until a shaggy dough forms.
- Cover the bowl with plastic wrap and let it rest for 12 to 18 hours at room temperature.
- After resting, flour a work surface and turn the dough out onto it, folding it over on itself a couple of times.
- Let the dough rest for about 15 minutes while you preheat your oven to 450 degrees F with a Dutch oven inside.
- Carefully remove the hot Dutch oven, place the dough inside, cover, and bake for 30 minutes.
- Uncover and bake for an additional 15-20 minutes until golden brown.
Notes
- For extra flavor, add herbs or cheese to the dough before baking.
- Experiment with different types of flour for a unique taste.
Nutrition
- Serving Size: 1 slice
- Calories: 150
- Sugar: 0.5g
- Sodium: 500mg
- Fat: 1g
- Saturated Fat: 0.2g
- Unsaturated Fat: 0.5g
- Trans Fat: 0g
- Carbohydrates: 30g
- Fiber: 1g
- Protein: 4g
- Cholesterol: 0mg
Keywords: Dutch Oven No Knead Bread


Leave a Reply